Agent dashboard
The agent dashboard is the home page for your support team. Every conversation across every channel — web widget, email, Slack, WhatsApp, Messenger — lands here when escalated. Agents handle them, agents see analytics, agents stay productive.
In this guide:
- Open the dashboard
- Read the queues
- Take a conversation
- Resolve and close
- Real-time updates
Step 1: Open the dashboard
In the chatbot detail page, click Conversations.
 Screenshot: The agent dashboard with multiple conversation rows.
Step 2: Read the queues
The dashboard organizes conversations into named queues:
| Queue | What’s there |
|---|---|
| Unassigned | Escalated by the bot, no agent yet picked it up. |
| My conversations | Conversations assigned to you. |
| Open | Active conversations across the org. |
| Closed / Solved | Recently resolved — for follow-up or audit. |
| Group chats | Multi-agent rooms — see Group chats. |
Switch queues from the left sub-nav.
Step 3: Take a conversation
Click any row in the Unassigned queue:
- The full transcript opens on the right.
- Read the bot’s prior turns — the bot’s last reply and why it escalated.
- Click Take conversation (or assign to a teammate, see Assignment & escalation).
- Type your reply in the composer at the bottom.
- Hit Send.
The customer sees your reply on whatever channel they messaged on — web widget, email, Slack, etc. — and replies on that channel. The thread continues in the dashboard.
Step 4: Resolve and close
When the issue is resolved:
- Click Mark as solved (or Close, depending on your workflow setting).
- Optionally, fill in a resolution code (refund, technical, account, other) for analytics.
Step 5: Real-time updates
The dashboard streams real-time:
- New conversations appear in Unassigned without a refresh.
- Customer replies push to your conversation pane (typing indicator → message).
- Teammate actions (someone took a conversation, closed one) update everyone’s view.
- Notifications ping your browser and (if connected) your Slack DM.
This uses SignalR + Socket.io under the hood. If you lose connection (network drop), the dashboard reconnects automatically with exponential backoff.
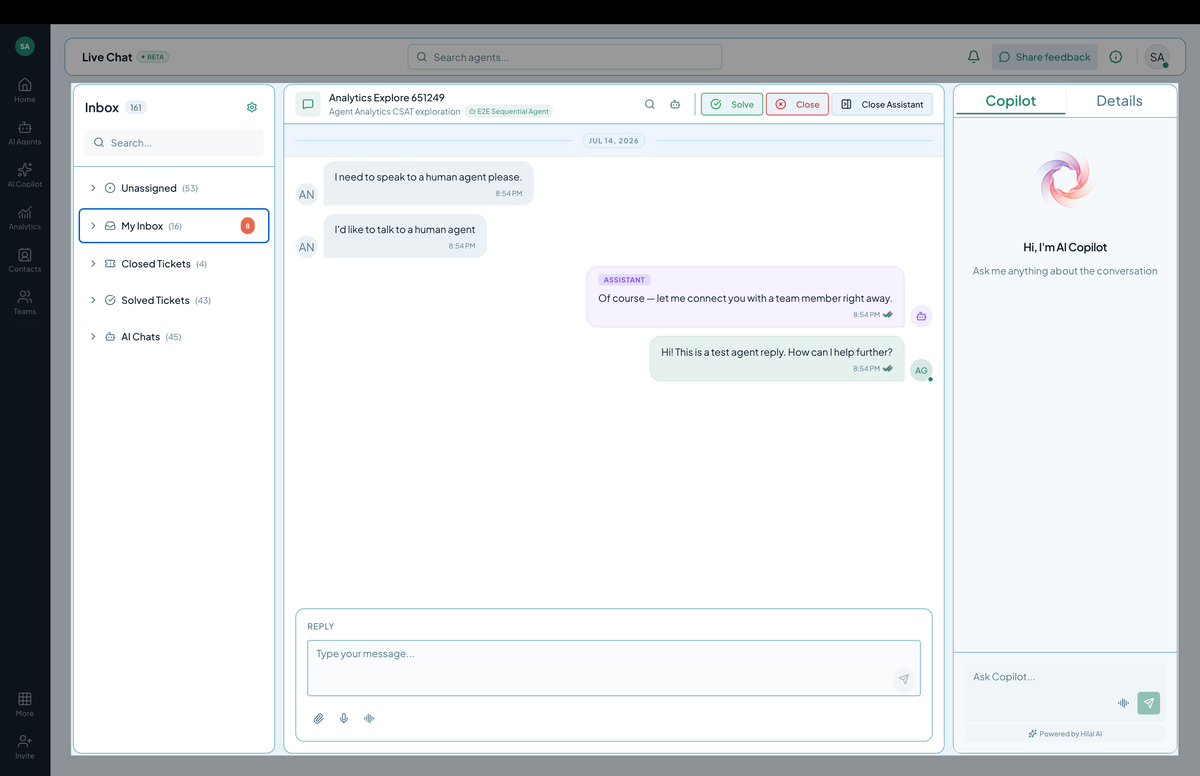
Anatomy of a conversation pane
Selecting a conversation reveals:
- Top bar — conversation title and short description, assigned agent, status and action controls: search, export/download.
- Transcript — every message, including customer messages, bot/assistant handoff messages, and agent replies, each timestamped with a read/delivered indicator.
- Composer — a Reply box to type a message, with options to attach a file, record audio, or send a voice note, plus a send button.
- Right rail — two tabs, Copilot and Details. The Copilot tab opens an AI assistant (“Ask me anything about the conversation”) with its own input box for querying the conversation, powered by Hilal AI. The Details tab holds contact details and conversation metadata, recent tickets (if Zendesk connected), past conversations with this user, knowledge sources cited in this conversation.
Permissions
To use the agent dashboard you need:
- Org membership.
conversations.readon at least one chatbot.conversations.respondto send messages.
Reach out to your Owner / Admin if features are missing.