Deploy to your website in 5 minutes
The fastest deployment is a single <script> tag on a custom website — the same widget powers every web embed. This guide installs it on one page so you can verify everything works.
In this guide:
- Open the Deploy tab
- Copy the embed snippet
- Paste it into your site’s HTML
- Verify the widget loads and answers
Prerequisites
- A chatbot you’ve tested in the Playground. → Test it in the Playground
- A website you can edit — even a one-page test HTML file works.
Step 1: Open the Deploy tab
On your chatbot detail page, click Deploy in the left rail.
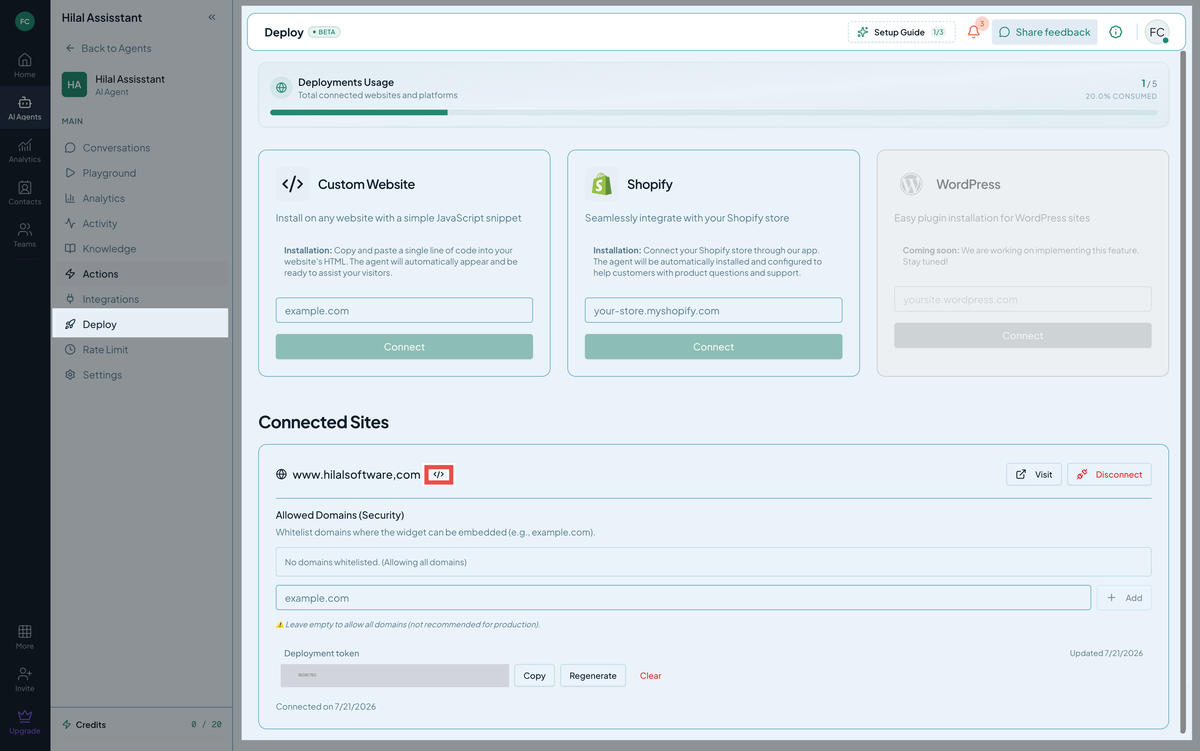 Screenshot: The Deploy tab showing the embed snippet with a copy button.
You’ll see a snippet that looks like:
<script src="https://cdn.hilalsoftware.tools/chat_v3.js"></script>
<script>
  window.HilalChat.init({
    organizationId: 'org_abc123',
    botId: 'bot_xyz789',
    theme: 'light'
  });
</script>
The exact organizationId and botId are pre-filled for your bot — copy your snippet, not the example here.
Step 2: Copy the snippet
Click Copy in the snippet’s top-right.
Step 3: Paste it into your site
Paste the snippet just before the closing </body> tag of any HTML page. For a quick local test, save the following file as test.html and open it in your browser:
<!DOCTYPE html>
<html>
<head><title>Hilal Chatbot test</title></head>
<body>
  <h1>Test page</h1>
  <p>The chat bubble should appear in the bottom-right corner.</p>

  <!-- paste your snippet here -->
</body>
</html>
Step 4: Verify
Refresh the page. The widget loads asynchronously, so it appears a moment after the rest of the page. You’ll see a chat bubble in the bottom-right corner.
Click it. Send the same questions you tested in the Playground. The answers should match.
Step 5: Customize the widget (optional)
The Deploy snippet supports a few quick options inline:
theme: 'light'or'dark'position: 'bottom-right'(default),'bottom-left', etc.primaryColor: '#0066ff'
For deep customization (logo, welcome messages, dimensions, fonts) use the Settings tab. → Customize widget appearance
For programmatic control (open/close from your own code, listen to events, pre-fill messages) see the developer JS API. → Developer embed JS API (New)
Troubleshooting
- Widget bubble doesn’t appear. Open the browser console; if you see a 404 on
chat_v3.js, the script URL is wrong — re-copy the snippet from your Deploy tab. If you see a CORS or auth error, theorganizationId/botIdmay be incorrect. - Widget appears but says “Connection error” on send. Your domain may not be allowed for this deployment. Add it in Deploy → Allowed domains, then refresh.
- The widget overlaps a button on your page. Switch
positionor passoffset: { bottom: 100, right: 20 }to theinit()call.
What’s next
You’ve shipped a chatbot. The rest of the Guide is reference — return to it section by section.